Monday, November 22, 2010

Brrrr... It's cold out there!

You have the dress. You have everything else in place. Then it occurs to you that you might get a little bit chilly in that beautiful strapless gown in December. Boleros used to be out of style, but now they are absolutely in. 


I think this bolero, from Etsy is whimsical and gorgeous. I adore the ruffled neckline and flower detail. This would be darling with a short dress for a courthouse wedding, or a simple strapless.


I am loving this wool caplet, also found on Etsy. There aren't many dresses that wouldn't look sensational with this caplet. You could add a beautiful brooch to the knot for some added glam.


Enzoani and Blue by Enzoani offer some gorgeous, fashion forward styles. Every single jacket they make is a true work of art. 


For extra warmth, check out this faux fur bolero. If you have a lace gown, or intricate beading, faux fur may be the best way to go. 
Many bridal lines have the option of a bolero made to match the dress. If you are considering one ask your bridal retailer for more information.

DIY Dessert Stands


I'm going to have to make these for myself-- they are so darn cute! I think they would be great for reception decor, if done right. They would also make excellent hostess gifts for your showers or bridesmaids gifts.

You will need:
-A drawer pull that is pretty. Browse antique stores, check out hardware stores, or hit up Anthropologie.
-An allthread to match. You can find these at hardware stores as well.
-A bolt and washer that fit, you will use these to screw in the bottom of your stand.
-A drill and bit.
-A candle stick. Some have a visible hole through the centers. Others need to have the dowel in the middle unscrewed.
-Plates. Melamine or ceramic are preferable for these instructions. Unlike the pictures, I think these plates would be more adorable with different sizes and designs, as long as they coordinate.
-Paint (optional)


Make sure your allthread and drawer pull are the same width. If your drawer pull has a rod like this one, you should be able to unscrew it, so the allthread can screw directly into the pull. It may take some torque, but you should be able to get it out. Pick up two allthreads if you’re going to want to change between two and three tiers with your cake stand. You’ll need an allthread for each different height.


If you are planning to paint your candlestick, do so before you start.  Next you’ll need to drill a hole right through the center of the plate. If you're afraid to do this, ask your fiancĂ© for help.. I advise you to use a wood bit for drilling through melamine and a ceramic bit for ceramic. You may also want an extra plate, just in case a plate cracks while it's being drilled. If you do crack a plate, you can drill a few extra holes in your broken plate and get a little practice. Drill directly through the center of your plate. If you need help finding the center, use a ruler.


Now all that is left is the assembly! Screw the entire stand together. Don't forget to use the washer and bolt on the bottom.


These don't have to be used solely for desserts. They make a great place to set your jewelry, too! The other fabulous thing about these stands is storage. You can easily disassemble them and store until the next party. 


Rue La La


If you don't know what Rue La La is, you're missing out! It's a website where big brand names have select items heavily discounted for a short period of time. You can only join by invite, but you're in luck! I'm personally inviting you to start shopping! Click that link, and you will be amazed at some of the fabulous deals you come across... Just in time for the holidays. Every two days, the "boutiques" change-- and things sell out fast.

Todays deals include BCBG shoes, Invicta watches, Stuart Weitzman's and much more.

I think it's the perfect place to look for that little dress you need for your rehearsal dinner or for a pair of perfect ivory shoes for the big day. It's also a great place to search for groom's gifts, they often have beautiful watches marked down to under $100.

Consider this my thanks to you, for reading my blog. Enjoy!

Friday, November 19, 2010

Cute save the date idea!

Thursday, November 18, 2010

DIY: String Lanterns


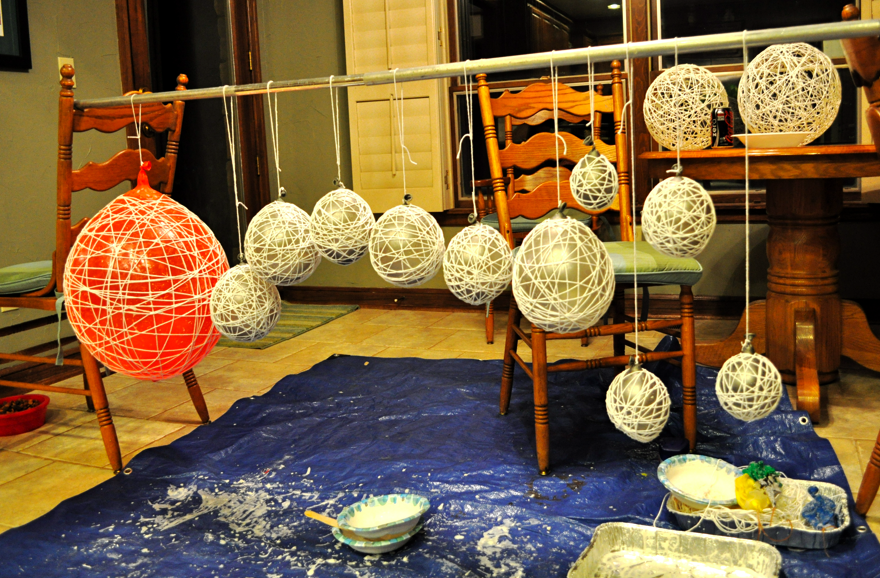
Every so often I see a DIY project that really seems incredible. I think these string lanterns would be perfect for an outdoor wedding, or even for your backyard. If you are crafty and unafraid of making a mess, this project is for you. Please don't try this on your carpet-- at a minimum do it on top of tarp. You're probably best off completing this project outside.

You will need:
-Large Balloons
-A Sharpie
-Scissors
-Cotton Yarn
-4 oz. White School Glue
-1/2 cup Corn Starch
-1/4 cup Water
-Something to stir with
-Petroleum Jelly
-Clear, fast drying spray paint
-Container for mixing glue in
-String

Directions:
1. Blow up a balloon. I would suggest only inflating until it is a decent size, but still round. If you get it too full, you'll end up with an oblong shaped lantern. I think for the best end result you will want varied sizes.
2. After the balloon is inflated to your desired size, draw a circle around the knot of the balloon big enough to put whatever light source you would like to use. If you are hanging from Christmas lights or something similar, you will need to fit the light into this hole. If you are just planning to put these into a vase or have no plans to light these up, forgo the sharpie.
3. Lay down your tarp, and find a way to suspend the balloons with string. You can use a shower curtain rod across chairs, a clothespin line, or a rope between two trees.
4. Mix the corn starch, glue, and warm water together until the mixture is nice and smooth.
5. Smear the petroleum jelly all over the balloon, until it is completely coated.
6. If you have a friend or your fiancĂ© helping you, this will go a lot quicker. One person should feed the yarn into the glue mixture, then hand it off to the other person, who will drape it around the balloon.

7. Begin wrapping the yarn vertically around the balloon at a comfortable tightness, and then gradually switch to wrapping it horizontally. Tuck your beginning and end pieces under other pieces of yarn.

8. After allowing the balls to dry for 24 hours, pop the balloons! Chop sticks or something similar can help remove any glue crystals that form between strings.

9. Spray the ball with the clear, fast drying spray paint outside.
10. Now hang your balls either from lights, from fishing wire, or display them in a vase or bowl!


For more fantastic DIYs and ideas, check out Wednesday Custom Design, Events, & Paperworks.
Trend Alert! Polka Dotted Wedding Cakes

Retro and chic at the same time, these polka dotted cakes are absolutely en vogue.


\


Wednesday, November 17, 2010

DIY Cupcake Topping Bar

If you want your guests to have something a little outside of the norm, go for a cupcake topping bar. This would also be excellent at a bridal shower, I think entertainment is important if all of your guests don't know one another.


Notice the hollowed out pumpkins that hold different toppings. Adorable!


I love the handmade tags they put on the syrup dispensers. 


A little something for everyone!


Are you hungry yet?